Do you get overwhelmed at the thought of starting a blog for your Etsy Shop? If so, I am here to help make the experience of getting started a lot smoother with this free guide on how to start a blog for Etsy Sellers.
I am sure you have heard it countless times that you must have a blog for your Etsy business to scale it to the next level.
If you’re new to blogging, I know it can be quite overwhelming to wrap your head around starting and still managing an Etsy Shop. I totally get it!
But today is your lucky day, I am going to literally hold your hand through the entire process so breathe and let’s go ahead and get started!
Before we begin, make sure to download this free checklist that will help you get the perfect start that you need.
Why Start A Blog For Your Etsy Shop?
A blog is essential for all Etsy Sellers. Blogging is an inexpensive way for Etsy sellers to gain online visibility, grow their brand, stand out from their competitors, and attract more perspective customers.
I have been blogging since 2009. It was a game-changer for me when I started. It has helped me get my name out as an Industry leader in the blogging space and now as an expert when it comes to learning about Etsy.
Blogging has been an instrumental tool for the growth of my brand. Why?? Because through my blog I can provide valuable content that provides value to my audience, they get to know who I am, and it helps me build the trust for people to buy my products and services.
Another great benefits of having a blog is not having to always be promoting your products all the time and coming off as a sleazy sales person. You can get in front of your audience by providing value through content and people will simply buy because the like you and trust you.
Amazing right? Let’s dive in on how to start a blog for your Etsy Shop.
Here are the steps broken down:
Step 1: Choose The Right Platform
There are so many options when it comes to choosing a platform for your Etsy blog, and some are free as well. After running several successful blogs, trying countless free platforms like Blogspot and Wix that comes with their own set off-limits of things you can or cannot do. I recommend WordPress.
WordPress is, by far, the most popular open-source content management system used by approximately 75 million websites. WordPress is free to install, deploy, and upgrade. You also get access to plugins that help enhance the functionality of your website and you can pretty much add anything you imagine on your website. If you’re serious about blogging and REALLY scaling your Etsy business to the next level, why not go with the best.
Many Etsy sellers shy away from using WordPress and start using sites like Wix or Blogspot. They are easier to get started but in the long run, your needs will tend to outgrow these beginner platforms and eventually many end up transferring their sites to WordPress, which can be a nightmare to do. Avoid this and just get started with WordPress today.
WordPress does have a bit of learning curve but in the long run, it’s the best decision for your Etsy business.
What is a self-hosted WordPress?
If you’re relatively new to WordPress, you might not realize that there are actually two versions of WordPress. One version is self-hosted and the other one is not self-hosted.
Anyone can create a free website using the version of WordPress that is not self-hosted. The hosting will be included by WordPress. The main disadvantage of going this route is the individual will not own the site and the URL of the site will not be unique. A not self-hosted WordPress URL looks like this: www.mywebsite.wordpress.com
Additional disadvantages of using the not self-hosted version:
- Not Enough Space: The free hosting providers have storage limits. You may find yourself running out of web space and needing to upgrade your account to get more space.
- No Ownership: The hosting company at any given moment can remove your website from their free service or forcefully charged you a fee to upgrade.
- Limited Features: Many of the features such as list building, SEO, monetizing your website, backup assistance, and plugins are not available.
- Hosting Advertising: If you would like to run ads and earn money from your website it’s not allowed in free hosting. The providers actually run their own ads.
I recommend using the self-hosted version of WordPress. You will own your entire blog/website. All you have to do is get a domain provider and sign up for a hosting service to host your site on the Internet.
How To Choose A Web Hosting Provider
The next step is choosing a web hosting provider for your website/blog. Here are some things you need to consider when choosing a hosting provider:
- How long has the company been around?
- Do they provide 24*7/365 technical support?
- Does the company offer SSL (Security Socket Layer)
- Does the company offer a secure website to protect from hacking?
- Does the company offer unmetered bandwidth?
- Does the company offer unlimited storage?
- Does the company offer a business email address?
These are some of the main things you need to consider choosing your web hosting provider for your website/blog.
As a beginner, I recommend HostGator for your Etsy blog. (Plus, you save 60% percent when you use my affiliate link)
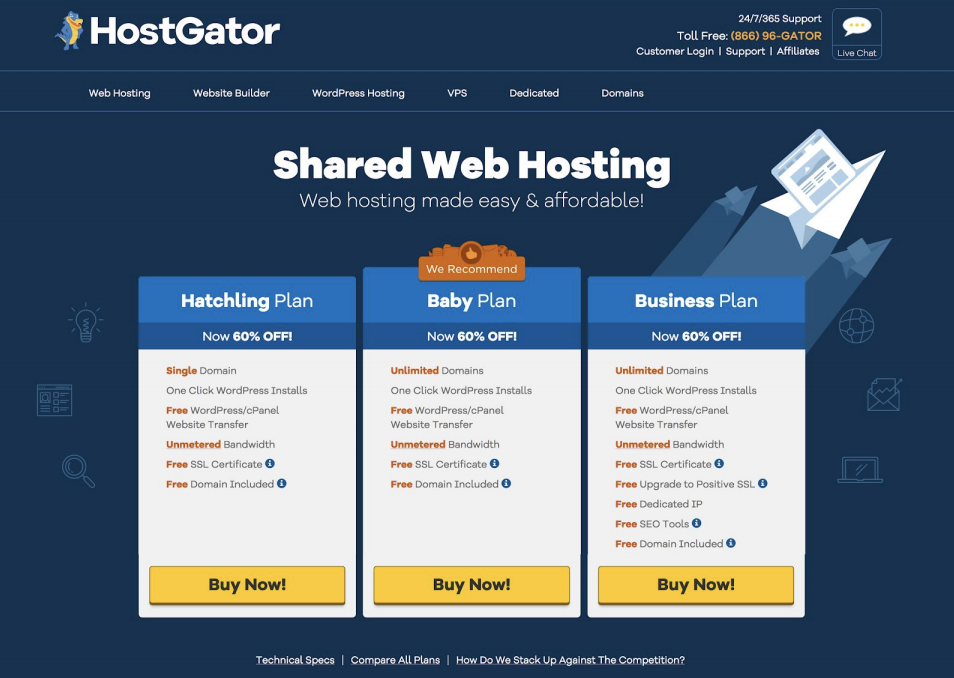
HostGator has plenty of affordable plans that are perfect for starting your blog. You can view these on their shared hosting plans page here.
“Disclosure: I earn a commission from HostGator if you use my referral link to make a purchase at no extra cost to you. Thanks for your support.”
They offer three plans. The Hatchling Plan, Baby Plan, and Business Plan. I personally have the baby plan because it allows for unlimited domains. It’s a great plan for anyone wanting to purchase multiple URLs in the future, and you don’t have to change your hosting package. This gives you the flexibility to support multiple brands, or change the name of your site later on.
I have been using HostGator now for over 7 years and they provide unlimited storage and email addresses, unlike other providers such as GoDaddy. They also include a Weebly website builder, so you can get the same functionality you would get with a provider like Squarespace, but with unlimited pages and email addresses.
In addition, they provide Google Adwords and Yahoo/Bing credit, which sets us apart as a great option for bloggers hoping to make money from their blogging venture.
Once you select a plan, click the bright yellow Buy Now! button to add the hosting package to your cart.
How To Choose And Register A Domain Name And Checkout
Now that you have chosen a plan, your next step is to choose and register a domain name. You can check to see what domains are available using HostGator’s Domain Registration tool.
Shopping Cart Step 1: Choose a Domain From here you can register a new domain name, or click the second tab “I Already Own This Domain” if you are only buying hosting.
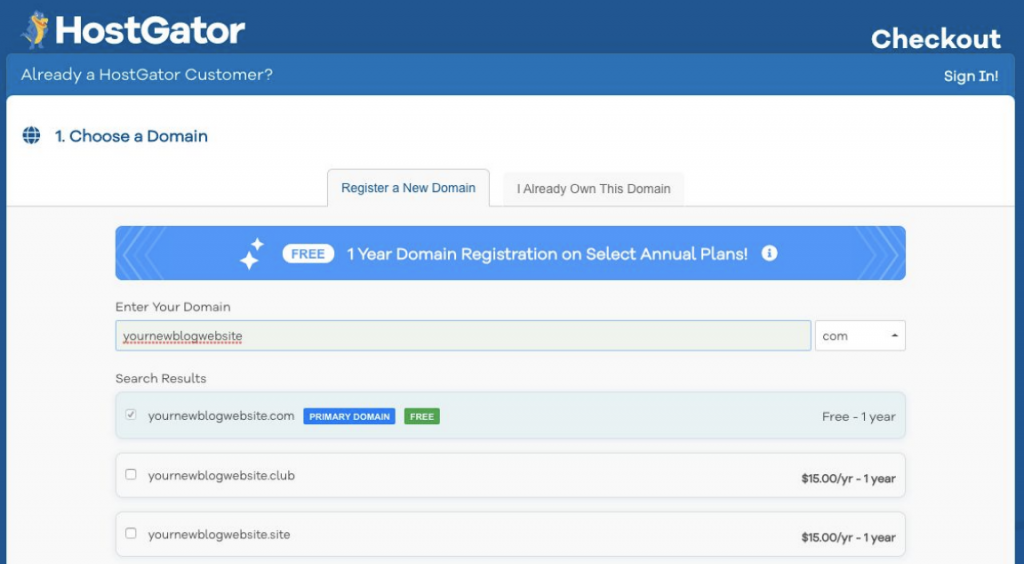
Make sure you keep Domain Privacy Protection checked. Explain how this masks the domain owner’s information in ICANN and replaces it with HostGator’s, so the domain owner can maintain their privacy online.
Scroll down to step 2. Here you’ll need to enter a user name and password that you’ll use to manage your hosting account with HostGator.
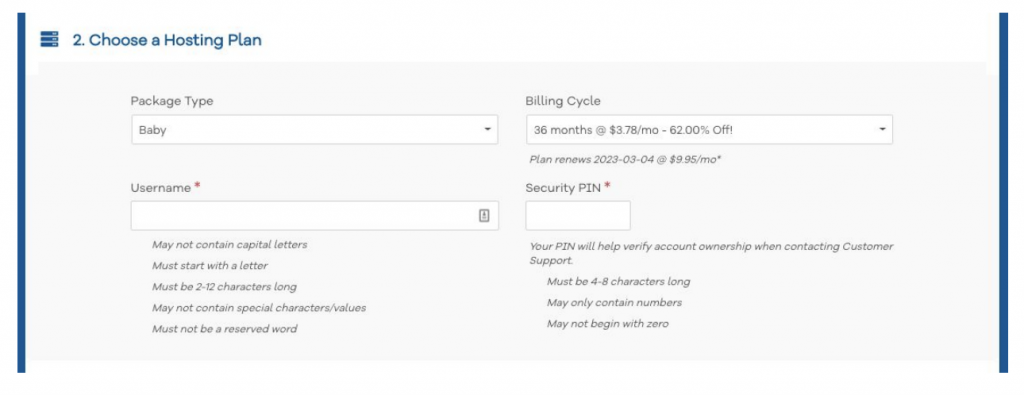
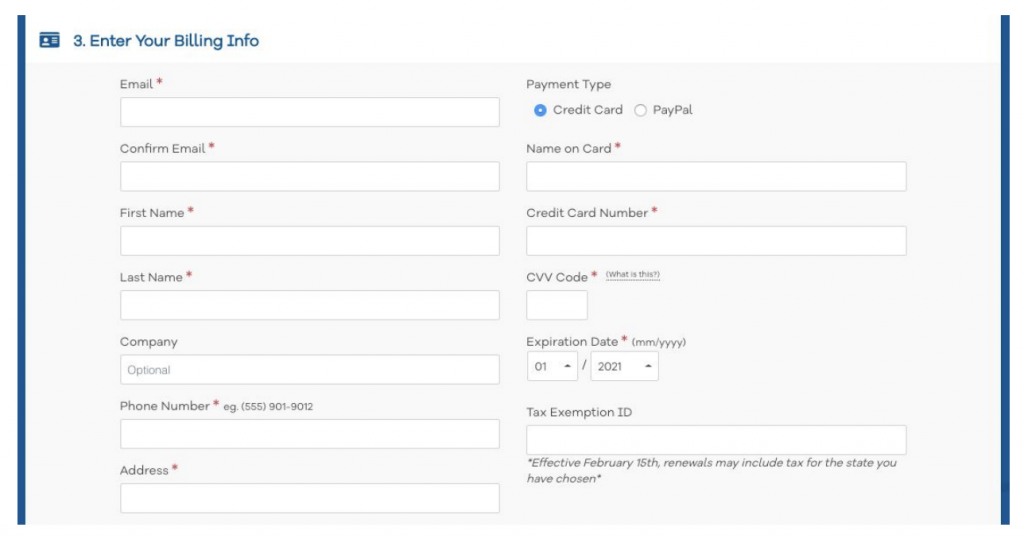
Enter your billing information in step 3.
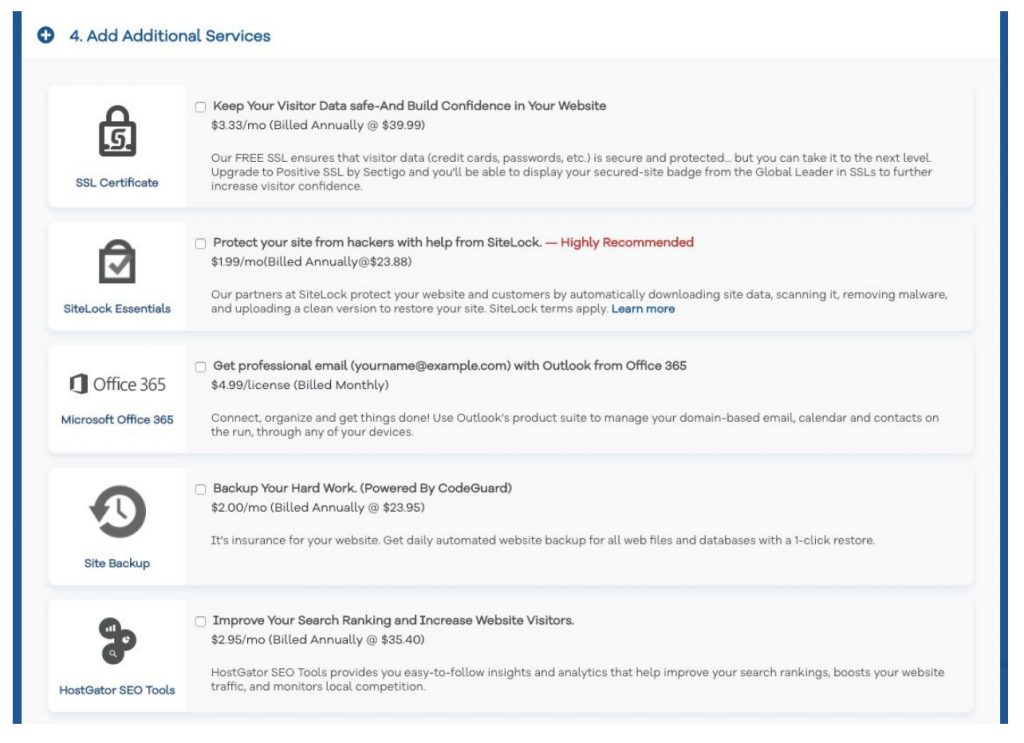
Choose any additional add-on services you’d like to purchase in step 4.
When you reach step 5, make sure to enter coupon code “SHARED3660”. If you go to HostGator by clicking my affiliate link here, you’ll receive an extra 60% off.

Finally, click that you agree to the Terms and Conditions. Then the big blue Checkout Now! button.

Congratulations! You’re now the proud owner of your very own website.
Installing WordPress
The next step is installing WordPress, the world’s most popular blogging platform, so you can get to work writing.
You can follow along with this video, or follow the steps I outline below:
When you completed your purchase, you should have received an email from HostGator with your cPanel username and password. cPanel is the portal you’ll use to manage your web hosting.
The cPanel link is unique to you, so be sure to bookmark it for future reference
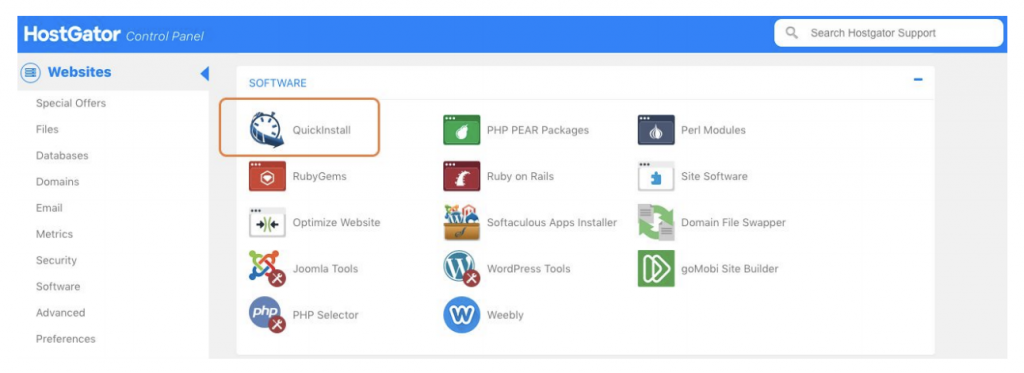
Log into cPanel, navigate to the Software section, and click on the Quick Install icon.
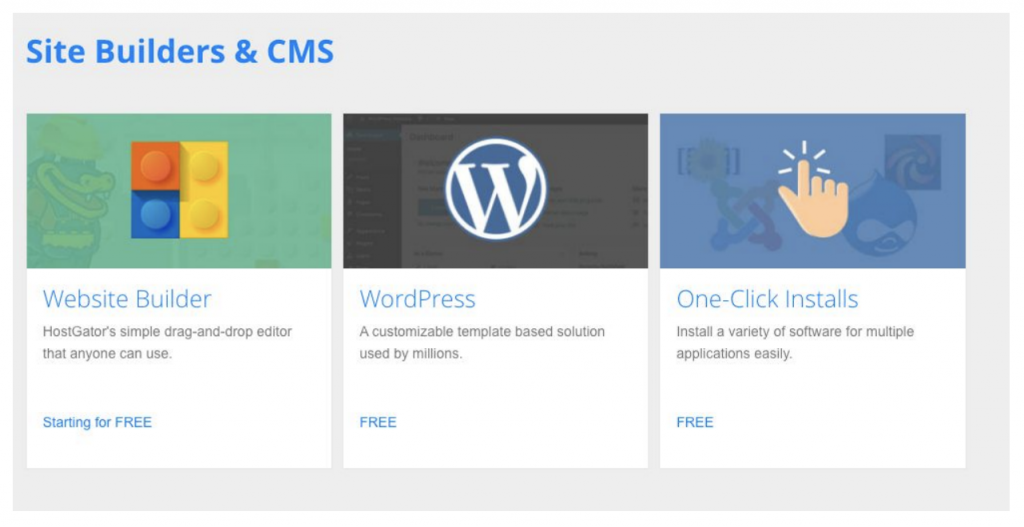
From there, you’ll see an option to Install WordPress for free, Click the WordPress section.
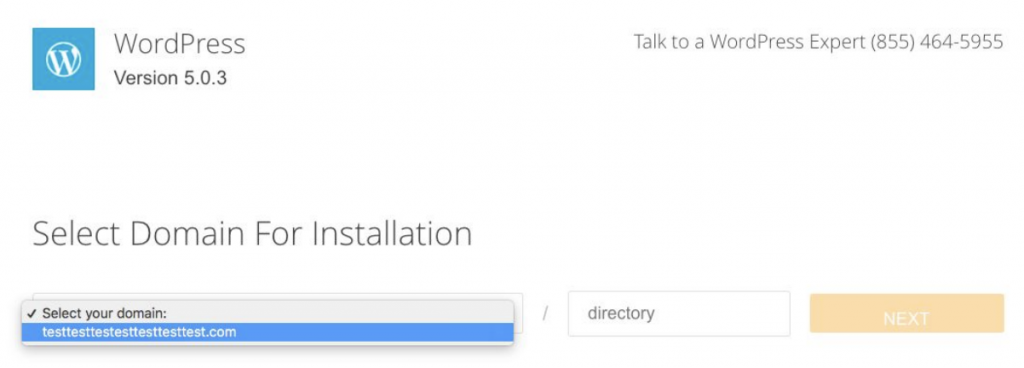
Next, you’ll need to select the domain you want to use for installation and click the NEXT button.
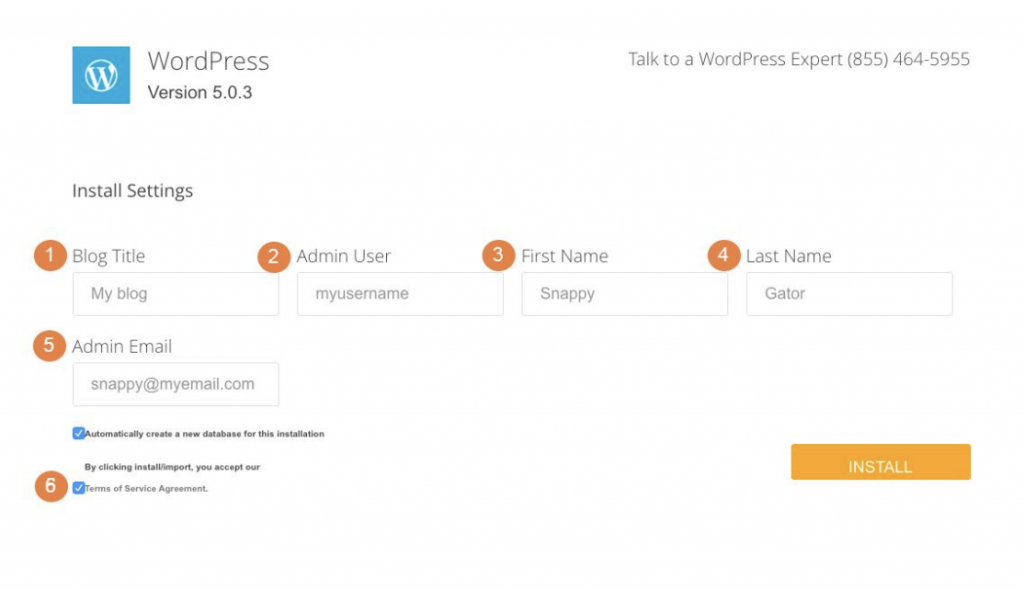
- For Blog Title, enter the name of the website. This is what will appear in the header as the name of your site.
- For Admin User, enter your preferred user name.
- Your first name.
- Your last name.
- For Admin Email, enter an email address where you want the admin password emailed to. Make sure this is a working email address.
- Click to agree to the Terms of Service
- Click Install WordPress when you’re ready to proceed.
A progress bar at the top of the page will let you know when the installation is complete. Once complete, you will be able to start working on your WordPress site. Check your email for your WordPress username and password as well as a link to your WordPress dashboard.
Phew! We have covered a lot of technical aspects on how to start a blog for your Etsy Shop.
Please note: that choosing the site platform, the hosting provider GatorHost, activating your domain name, and installing WordPress is just the beginning of you starting your Etsy blog.
I hope you have enjoyed this Esty blog tutorial!